
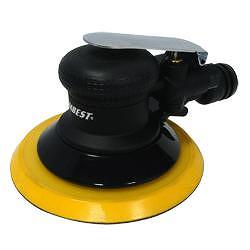
3 in Orbital Sander: A Comprehensive Guide
Are you in the market for a versatile and powerful orbital sander? Look no further than the 3 in orbital sander. This tool is a game-changer for both professionals and DIY enthusiasts alike. In this detailed guide, we will explore the features, benefits, and usage tips of the 3 in orbital sander, ensuring you make an informed decision for your sanding needs.
Key Features of the 3 in Orbital Sander

The 3 in orbital sander is designed with a range of features that make it a standout choice among sanders. Here are some of its key features:
| Feature | Description |
|---|---|
| 3-inch Sanding Discs | Equipped with a 3-inch sanding disc, this sander provides ample coverage for a variety of sanding tasks. |
| Variable Speed Control | Adjust the speed of the sander to match the requirements of your project, ensuring optimal sanding results. |
| Orbital Action | The orbital action reduces sanding marks and provides a smooth finish on your workpiece. |
| Soft Start | Prevent sudden starts that can damage your workpiece or cause injury. |
| Comfortable Grip | With an ergonomic design, the sander offers a comfortable grip for extended use. |
These features make the 3 in orbital sander a versatile and user-friendly tool that can handle a wide range of sanding tasks.
Benefits of Using the 3 in Orbital Sander
There are several benefits to using the 3 in orbital sander for your sanding projects:
-
Efficiency: The 3 in orbital sander allows you to sand larger areas in less time compared to traditional sandpaper.
-
Smooth Finish: The orbital action reduces sanding marks and provides a smooth finish on your workpiece.
-
Variable Speed: Adjust the speed of the sander to match the requirements of your project, ensuring optimal sanding results.
-
Comfortable Use: The ergonomic design and comfortable grip make the sander easy to use for extended periods.
-
Cost-Effective: The 3 in orbital sander is a cost-effective solution for sanding projects, as it eliminates the need for multiple sanding tools.
How to Use the 3 in Orbital Sander

Using the 3 in orbital sander is straightforward. Follow these steps to achieve the best results:
-
Attach the appropriate sanding disc to the sander.
-
Adjust the speed of the sander to match the requirements of your project.
-
Start the sander and apply gentle pressure to the workpiece.
-
Maintain a consistent speed and pressure while sanding.
-
Change the sanding disc as needed to achieve the desired finish.
Maintenance and Care
Proper maintenance and care are essential to ensure the longevity of your 3 in orbital sander:
-
After each use, clean the sander and sanding disc to remove debris and dust.
-
Regularly inspect the sander for any signs of wear or damage.
-
Replace worn-out parts, such as sanding discs or brushes, as needed.
-
Store the sander in a dry, cool place when not in use.
Conclusion
The 3 in orbital sander is a versatile and powerful tool that can help you achieve professional-quality sanding results. With its user-friendly design, efficient performance, and numerous benefits, this sander is an excellent choice for both professionals and DIY enthusiasts


