
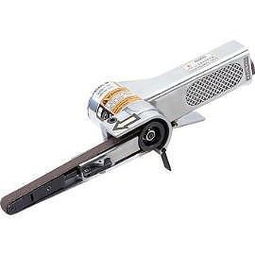
3 x 21 Belt Sander: A Comprehensive Guide
Are you in the market for a reliable and efficient belt sander? Look no further than the 3 x 21 belt sander. This versatile tool is a favorite among woodworkers, DIY enthusiasts, and professionals alike. In this detailed guide, we’ll explore the features, benefits, and specifications of the 3 x 21 belt sander, helping you make an informed decision for your woodworking needs.
Key Features

The 3 x 21 belt sander is designed with a range of features that make it a standout choice in the market. Here are some of its key features:
| Feature | Description |
|---|---|
| Size | 3 x 21 inches, providing ample workspace for large projects |
| Power | 3 horsepower motor for powerful sanding performance |
| Variable Speed | Adjustable speed settings for different sanding applications |
| Cast Iron Base | Sturdy and durable construction for long-lasting use |
| Tool-Free Belt Change | Quick and easy belt replacement without tools |
These features make the 3 x 21 belt sander a versatile tool that can handle a wide range of sanding tasks, from smoothing rough surfaces to achieving a fine finish on wood projects.
Benefits of Using the 3 x 21 Belt Sander
Choosing the 3 x 21 belt sander over other sanding tools offers several benefits:
-
Increased Efficiency: The powerful 3 horsepower motor allows for quick and efficient sanding, saving you time and effort.
-
Ample Workspace: The 3 x 21 inch size provides ample workspace for large projects, ensuring that you can sand your workpieces without any hassle.
-
Variable Speed: The adjustable speed settings allow you to tailor the sanding process to your specific needs, ensuring a consistent and high-quality finish.
-
Sturdy Construction: The cast iron base ensures stability and durability, providing a reliable tool for years to come.
-
Tool-Free Belt Change: The easy-to-use belt change system allows for quick and hassle-free belt replacement, saving you time and effort.
How to Use the 3 x 21 Belt Sander
Using the 3 x 21 belt sander is a straightforward process. Here’s a step-by-step guide to help you get started:
-
Secure the workpiece: Place your workpiece on a stable surface and secure it using clamps or a vise to prevent movement during sanding.
-
Attach the belt: Open the sander’s door and insert the belt into the machine. Make sure it is properly aligned and tensioned.
-
Adjust the speed: Set the desired speed based on the type of sanding you’re doing. For rough sanding, use a higher speed, and for fine finishing, use a lower speed.
-
Start sanding: Hold the sander firmly and move it across the workpiece in a consistent, even motion. Avoid pressing too hard, as this can cause damage to the workpiece.
-
Change the belt: Once you’ve finished sanding, remove the belt and replace it with a new one if necessary.
Comparison with Other Sanding Tools
When comparing the 3 x 21 belt sander with other sanding tools, such as orbital sanders and drum sanders, there are several factors to consider:
-
Orbital Sander: While orbital sanders are great for finishing work, they lack the power and versatility of a belt sander. The 3 x 21 belt sander is better suited for larger projects and rough sanding tasks.
-
Drum Sander: Drum sand


